Installing an XRootD Storage Element
Warning
This page is out of date.
XRootD is a hierarchical storage system that can be used in a variety of ways to access data, typically distributed among actual storage resources. One way to use XRootD is to have it refer to many data resources at a single site, and another way to use it is to refer to many storage systems, most likely distributed among sites. An XRootD system includes a redirector, which accepts requests for data and finds a storage repository — locally or otherwise — that can provide the data to the requestor.
Use this page to learn how to install, configure, and use an XRootD redirector as part of a Storage Element (SE) or as part of a global namespace.
Before Starting
Before starting the installation process, consider the following points:
- User IDs: If it does not exist already, the installation will create the Linux user ID
xrootd - Service certificate: The XRootD service uses a host certificate at
/etc/grid-security/host*.pem - Networking: The XRootD service uses port 1094 by default
As with all OSG software installations, there are some one-time (per host) steps to prepare in advance:
- Ensure the host has a supported operating system
- Obtain root access to the host
- Prepare the required Yum repositories
- Install CA certificates
Installing an XRootD Server
An installation of the XRootD server consists of the server itself and its dependencies. Install these with Yum:
root@host # yum install osg-xrootd
Configuring an XRootD Server
An advanced XRootD setup has multiple components; it is important to validate that each additional component that you set up is working before moving on to the next component. We have included validation instructions after each component below.
Creating an XRootD cluster
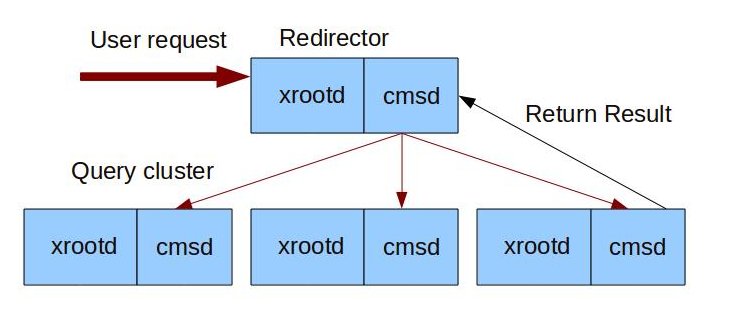
If your storage is spread out over multiple hosts, you will need to set up an XRootD cluster. The cluster uses one "redirector" node as a frontend for user accesses, and multiple data nodes that have the data that users request. Two daemons will run on each node:
xrootd
The eXtended Root Daemon controls file access and storage.
cmsd
The Cluster Management Services Daemon controls communication between nodes.
Note that for large virtual organizations, a site-level redirector may actually also communicate upwards to a regional or global redirector that handles access to a multi-level hierarchy. This section will only cover handling one level of XRootD hierarchy.
In the instructions below, <RDRNODE> will refer to the redirector host and <DATANODE> will
refer to the data node host.
These should be replaced with the fully-qualified domain name of the host in question.
Modify /etc/xrootd/xrootd-clustered.cfg
You will need to modify the xrootd-clustered.cfg on the redirector node and each data node.
The following example should serve as a base configuration for clustering. Further customizations are detailed below.
all.export /mnt/xrootd stage
set xrdr = <RDRNODE>
all.manager $(xrdr):3121

if $(xrdr)
  # Lines in this block are only executed on the redirector node
  all.role manager
else
  # Lines in this block are executed on all nodes but the redirector node
  all.role server
  cms.space min 2g 5g
fi
You will need to customize the following lines:
| Configuration Line | Changes Needed |
|---|---|
all.export /mnt/xrootd stage |
Change /mnt/xrootd to the directory to allow XRootD access to |
set xrdr=<RDRNODE> |
Change to the hostname of the redirector |
cms.space min 2g 5g |
Reserve this amount of free space on the node. For this example, if space falls below 2GB, xrootd will not store further files on this node until space climbs above 5GB. You can use k, m, g, or t to indicate kilobyte, megabytes, gigabytes, or terabytes, respectively. |
Further information can be found at https://xrootd.org/docs.html
Verifying the clustered config
Start both xrootd and cmsd on all nodes according to the instructions in the
Using XRootD section.
Verify that you can copy a file such as /bin/sh to /mnt/xrootd on the server data via the redirector:
root@host # xrdcp /bin/sh  root://<RDRNODE>:1094///mnt/xrootd/second_test
[xrootd] Total 0.76 MB  [====================] 100.00 % [inf MB/s]
Check that the /mnt/xrootd/second_test is located on data server <DATANODE>.
(Optional) Adding High Availability (HA) redirectors
It is possible to have an XRootD clustered setup with more than one redirector to ensure high availability service. To do this:
-
In the
/etc/xrootd/xrootd-clustered.cfgon each data node follow the instructions in this section with:set xrdr1 = <RDRNODE1> set xrdr2 = <RDRNODE2> all.manager $(xrdr1):3121 all.manager $(xrdr2):3121 -
Create DNS
ALIASrecords for<RDRNODE>pointing to<RDNODE1>and<RDRNODE2> - Advertise the
<RDRNODE>FQDN to users interacting with the XRootD cluster should be<RDRNODE>.
(Optional) Adding Simple Server Inventory to your cluster
The Simple Server Inventory (SSI) provide means to have an inventory for each data server. SSI requires:
- A second instance of the
xrootddaemon on the redirector - A "composite name space daemon" (
XrdCnsd) on each data server; this daemon handles the inventory
As an example, we will set up a two-node XRootD cluster with SSI.
Host A is a redirector node that is running the following daemons:
- xrootd redirector
- cmsd
- xrootd - second instance that required for SSI
Host B is a data server that is running the following daemons:
- xrootd data server
- cmsd
- XrdCnsd - started automatically by xrootd
We will need to create a directory on the redirector node for Inventory files.
root@host # mkdir -p /data/inventory
root@host # chown xrootd:xrootd /data/inventory
On the data server (host B) let's use a storage cache that will be at a different location from /mnt/xrootd.
root@host # mkdir -p  /local/xrootd
root@host # chown xrootd:xrootd /local/xrootd
We will be running two instances of XRootD on <HOST A>.
Modify /etc/xrootd/xrootd-clustered.cfg to give the two instances different behavior, as such:
all.export /data/xrootdfs
set xrdr=<HOST A>
all.manager $(xrdr):3121
if $(xrdr) && named cns
      all.export /data/inventory
      xrd.port 1095
else if $(xrdr)
      all.role manager
      xrd.port 1094
else
      all.role server
      oss.localroot /local/xrootd
      ofs.notify closew create mkdir mv rm rmdir trunc | /usr/bin/XrdCnsd -d -D 2 -i 90 -b $(xrdr):1095:/data/inventory
      #add cms.space if you have less the 11GB
      cms.space min 2g 5g
fi
The value of oss.localroot will be prepended to any file access.
E.g. accessing root://<RDRNODE>:1094//data/xrootdfs/test1 will actually go to
/local/xrootd/data/xrootdfs/test1.
Starting a second instance of XRootD
- Create a symlink pointing to
/etc/xrootd/xrootd-clustered.cfgat/etc/xrootd/xrootd-cns.cfg:
root@host # ln -s /etc/xrootd/xrootd-clustered.cfg /etc/xrootd/xrootd-cns.cfg
- Start an instance of the
xrootdservice namedcnsusing the syntax in the managing services section:
root@host # systemctl start xrootd@cns
Testing an XRootD cluster with SSI
- Copy file to redirector node specifying storage path (/data/xrootdfs instead of /mnt/xrootd):
root@host # xrdcp /bin/sh root://<RDRNODE>:1094//data/xrootdfs/test1
[xrootd] Total 0.00 MB [================] 100.00 % [inf MB/s]
- To verify that SSI is working execute
cns_ssicommand on the redirector node:
root@host # cns_ssi list /data/inventory
fermicloud054.fnal.gov incomplete inventory as of Mon Apr 11 17:28:11 2011
root@host # cns_ssi updt /data/inventory
cns_ssi: fermicloud054.fnal.gov inventory with 1 directory and 1 file updated with 0 errors.
root@host # cns_ssi list /data/inventory
fermicloud054.fnal.gov complete inventory as of Tue Apr 12 07:38:29 2011 /data/xrootdfs/test1
Note: In this example, fermicloud53.fnal.gov is a redirector node and fermicloud054.fnal.gov is a data node.
(Optional) Enabling Xrootd over HTTP
XRootD can be accessed using the HTTP protocol. To do that:
-
Add the following line to
/etc/xrootd/config.d/10-common-site-local.cfg:set EnableHttp = 1 -
Testing the configuration
From the terminal, generate a proxy and attempt to use davix-get to copy from your XRootD host (the XRootD service needs running; see the services section). For example, if your server has a file named
/store/user/test.root:davix-get https://<YOUR FQDN>:1094/store/user/test.root -E /mnt/xrootd/x509up_u`id -u` --capath /etc/grid-security/certificates
Note
For clients to successfully read from the regional redirector, HTTPS must be enabled for the data servers and the site-level redirector.
Warning
If you have u * in your Authfile, recall this provides an authorization to ALL users, including unauthenticated. This includes random web spiders!
(Optional) Enable HTTP based Writes
No changes to the HTTP module is needed to enable HTTP-based writes. The HTTP protocol uses the same authorization setup as the XRootD protocol. For example, you may need to provide a (all) style authorizations to allow users authorization to write. See the Authentication File section for more details.
(Optional) Enabling a FUSE mount
XRootD storage can be mounted as a standard POSIX filesystem via FUSE, providing users with a more familiar interface..
Modify /etc/fstab by adding the following entries:
....
xrootdfs                /mnt/xrootd              fuse    rdr=xroot://<REDIRECTOR FQDN>:1094/<PATH TO FILE>,uid=xrootd 0 0
Replace /mnt/xrootd with the path that you would like to access with.
Create /mnt/xrootd directory. Make sure the xrootd user exists on the system. Once you are finished, you can mount it:
mount /mnt/xrootd
You should now be able to run UNIX commands such as ls /mnt/xrootd to see the contents of the XRootD server.
(Optional) Authorization
For information on how to configure XRootD authorization, please refer to the Configuring XRootD Authorization guide.
(Optional) Adding CMS TFC support to XRootD (CMS sites only)
For CMS users, there is a package available to integrate rule-based name lookup using a storage.xml file.
See this documentation.
(Optional) Adding Multi user support for an XRootd server
For documentation how to enable multi-user support using XRootD see this documentation.
(Optional) Adding File Residency Manager (FRM) to an XRootd cluster
If you have a multi-tiered storage system (e.g. some data is stored on SSDs and some on disks or tapes), then install the File Residency Manager (FRM), so you can move data between tiers more easily. If you do not have a multi-tiered storage system, then you do not need FRM and you can skip this section.
The FRM deals with two major mechanisms:
- local disk
- remote servers
The description of fully functional multiple XRootD clusters is beyond the scope of this document. In order to have this fully functional system you will need a global redirector and at least one remote XRootD cluster from where files could be moved to the local cluster.
Below are the modifications you should make in order to enable FRM on your local cluster:
- Make sure that FRM is enabled in
/etc/sysconfig/xrootdon your data sever:
ROOTD_USER=xrootd
XROOTD_GROUP=xrootd
XROOTD_DEFAULT_OPTIONS="-l /var/log/xrootd/xrootd.log -c /etc/xrootd/xrootd-clustered.cfg"
CMSD_DEFAULT_OPTIONS="-l /var/log/xrootd/cmsd.log -c /etc/xrootd/xrootd-clustered.cfg"
FRMD_DEFAULT_OPTIONS="-l /var/log/xrootd/frmd.log -c /etc/xrootd/xrootd-clustered.cfg"
XROOTD_INSTANCES="default"
CMSD_INSTANCES="default"
FRMD_INSTANCES="default"
- Modify
/etc/xrootd/xrootd-clustered.cfgon both nodes to specify options forfrm_xfrd(File Transfer Daemon) andfrm_purged(File Purging Daemon). For more information, you can visit the FRM Documentation - Start frm daemons on data server:
root@host # service frm_xfrd start
root@host # service frm_purged start
Using XRootD
Managing XRootD services
Start services on the redirector node before starting any services on the data nodes.
If you installed only XRootD itself, you will only need to start the xrootd service.
However, if you installed cluster management services, you will need to start cmsd as well.
XRootD determines which configuration to use based on the service name specified by systemctl.
For example, to have xrootd use the clustered config, you would start up xrootd with this line:
root@host # systemctl start xrootd@clustered
To use the standalone config instead, you would use:
root@host # systemctl start xrootd@standalone
The services are:
| Service | EL 8 & 9 service name |
|---|---|
| XRootD (standalone config) | xrootd@standalone |
| XRootD (clustered config) | xrootd@clustered |
| XRootD (multiuser) | xrootd-privileged@clustered |
| CMSD (clustered config) | cmsd@clustered |
As a reminder, here are common service commands (all run as root):
| To ... | On EL 8 & 9, run the command... |
|---|---|
| Start a service | systemctl start SERVICE-NAME |
| Stop a service | systemctl stop SERVICE-NAME |
| Enable a service to start during boot | systemctl enable SERVICE-NAME |
| Disable a service from starting during boot | systemctl disable SERVICE-NAME |
Getting Help
To get assistance. please use the Help Procedure page.
Reference
File locations
| Service/Process | Configuration File | Description |
|---|---|---|
xrootd |
/etc/xrootd/xrootd-clustered.cfg |
Main clustered mode XRootD configuration |
/etc/xrootd/auth_file |
Authorized users file |
| Service/Process | Log File | Description |
|---|---|---|
xrootd |
/var/log/xrootd/xrootd.log |
XRootD server daemon log |
cmsd |
/var/log/xrootd/cmsd.log |
Cluster management log |
cns |
/var/log/xrootd/cns/xrootd.log |
Server inventory (composite name space) log |
frm_xfrd, frm_purged |
/var/log/xrootd/frmd.log |
File Residency Manager log |