GlideinWMS Factory Installation
This document describes how to install a Glidein Workflow Managment System (GlideinWMS) Factory instance.
This document assumes expertise with HTCondor and familiarity with the GlideinWMS software. It does not cover anything but the simplest possible install. Please consult the GlideinWMS reference documentation for advanced topics, including non-root, non-RPM-based installation. In this document the terms glidein and pilot (job) will be used interchangeably.
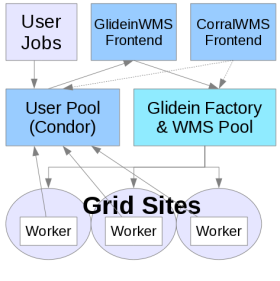
This parts covers these primary components of the GlideinWMS system:
- WMS Collector / Schedd: A set of
condor_collectorandcondor_scheddprocesses that allow the submission of pilots to Grid entries. - GlideinWMS Factory: The process submitting the pilots when needed
Warning
We really recommend you to use the OSG provided Factory and not to install your own. A VO Frontend is sufficient to submit your jobs and to decide scheduling policies. And this will avoid for you the complexity to deal directly with grid/cloud sites. If you really need you own Factory be aware that it is a complex component and may require a non trivial maintenance effort.
Before Starting
Before starting the installation process, consider the following points (consulting the Reference section below as needed):
Requirements
Host and OS
- A host to install the GlideinWMS Factory (pristine node).
- Currently most of our testing has been done on Scientific Linux 6 and 7.
- Root access
The GlideinWMS Factory has the following requirements:
- CPU: 4-8 cores for a large installation (1 should suffice on a small install)
- RAM: 4-8GB on a large installation (1GB should suffice for small installs)
- Disk: 10GB will be plenty sufficient for all the binaries, config and log files related to GlideinWMS. If you are a large site with need to keep significant history and logs, you may want to allocate 100GB+ to store long histories.
Users
The GlideinWMS Factory installation will create the following users unless they are already created.
| User | Default uid | Comment |
|---|---|---|
| condor | none | HTCondor user (installed via dependencies). |
| gfactory | none | This user runs the GlideinWMS VO factory. |
To verify that the user gfactory has gfactory as primary group check the output of
root@host # getent passwd gfactory | cut -d: -f4 | xargs getent group
It should be the gfactory group.
Certificates
| Certificate | User that owns certificate | Path to certificate |
|---|---|---|
| Host certificate | root | /etc/grid-security/hostcert.pem /etc/grid-security/hostkey.pem |
Here are instructions to request a host certificate.
The host certificate/key is used for authorization, however, authorization between the Factory and the GlideinWMS collector is done by file system authentication.
Networking
Firewalls
It must be on the public internet, with at least one port open to the world; all worker nodes will load data from this node trough HTTP. Note that worker nodes will also need outbound access in order to access this HTTP port.
Installation Procedure
As with all OSG software installations, there are some one-time (per host) steps to prepare in advance:
- Ensure the host has a supported operating system
- Obtain root access to the host
- Prepare the required Yum repositories
- Install CA certificates
Installing HTCondor
Most required software is installed from the Factory RPM installation. HTCondor is the only exception since there are many different ways to install it, using the RPM system or not. You need to have HTCondor installed before installing the GlideinWMS Factory. If yum cannot find a HTCondor RPM, it will install the dummy empty-condor RPM, assuming that you installed HTCondor using a tarball distribution.
- If you don't have HTCondor already installed, you can install the HTCondor RPM from the OSG repository:
root@host # yum install condor.x86_64
Installing HTCondor-BOSCO
If you plan to send jobs using direct batch submission (aka BOSCO), then you need also the condor-bosco package. You'll have to install the package and remove one of its files /etc/condor/config.d/60-campus_factory.config because it interferes with the Factory configuration.
root@host # yum install condor-bosco
root@host # rm /etc/condor/config.d/60-campus_factory.config
root@host # touch /etc/condor/config.d/60-campus_factory.config
Install GWMS Factory
Download and install the Factory RPM
Install the RPM and dependencies (be prepared for a lot of dependencies).
root@host # yum install glideinwms-factory
This will install the current production release verified and tested by OSG with default HTCondor configuration. This command will install the GlideinWMS Factory, HTCondor, the OSG client, and all the required dependencies.
If you wish to install a different version of GlideinWMS, add the "--enablerepo" argument to the command as follows:
yum install --enablerepo=osg-testing glideinwms-factory: The most recent production release, still in testing phase. This will usually match the current tarball version on the GlideinWMS home page. (The osg-release production version may lag behind the tarball release by a few weeks as it is verified and packaged by OSG). Note that this will also take the osg-testing versions of all dependencies as well.yum install --enablerepo=osg-upcoming glideinwms-factory: The most recent development series release, ie version 3.3.x release. This has newer features such as cloud submission support, but is less tested.
Download HTCondor tarballs
You will need to download HTCondor tarballs for each architecture that you want to deploy pilots on.
At this point, GlideinWMS factory does not support pulling HTCondor binaries from your system area.
Suggested is that you put these binaries in /var/lib/gwms-factory/condor but any gfactory accessible location should suffice.
Configuration Procedure
After installing the RPM you need to configure the components of the GlideinWMS Factory:
- Edit Factory configuration options
- Edit HTCondor configuration options
- Create a HTCondor grid map file
- Reconfigure and Start Factory
Configuring the Factory
The configuration file is /etc/gwms-factory/glideinWMS.xml. The next steps will describe each line that you will need to edit for most cases, but you may want to review the whole file to be sure that it is configured correctly.
Security configuration
In the security section, you will need to provide each Frontend that is allowed to communicate with the Factory:
security key_length="2048" pub_key="RSA" remove_old_cred_age="30" remove_old_cred_freq="24" reuse_oldkey_onstartup_gracetime="900">
  <frontends>
     <frontend identity="vofrontend_service@FACTORY_COLLECTOR_HOSTNAME" name="%ORANGE%vofrontend_sec_name%ENDCOLOR%">
        <security_classes>
           <security_class name="%RED%frontend_sec_class%ENDCOLOR%" username="frontend" />
        </security_classes>
     </frontend>
  </frontends>
</security>
These attributes are very important to get exactly right or the Frontend will not be trusted. This should match one of the factory and security sections of the Frontend configuration Configuring the GlideinWMS Frontend in the following way:
Note
This is a snippet from the Frontend configuration (for reference), not the Factory that you are configuring now!
For the factory section:
# from frontend.xml
<factory query_expr='((stringListMember("VO", GLIDEIN_Supported_VOs)))'>
....
   <collectors>
      <collector DN="/DC=org/DC=doegrids/OU=Services/CN=FACTORY_COLLECTOR_HOSTNAME"
      comment="Define factory collector globally for simplicity"
      factory_identity="gfactory@FACTORY_COLLECTOR_HOSTNAME"
      my_identity="%GREEN%username%ENDCOLOR%@FACTORY_COLLECTOR_HOSTNAME"
      node="FACTORY_COLLECTOR_HOSTNAME"/>
   </collectors>
</factory>
For the security:
# from frontend.xml
<security classad_proxy="/tmp/vo_proxy" proxy_DN="DN of vo_proxy"
      proxy_selection_plugin="ProxyAll"
      security_name="The security name, this is used by factory"
      sym_key="aes_256_cbc">
      <credentials>
         <credential absfname="/tmp/pilot_proxy" security_class="frontend"
         trust_domain="OSG" type="grid_proxy"/>
      </credentials>
</security>
Note that the identity of the Frontend must match what HTCondor authenticates the DN of the frontend to. In /etc/condor/certs/condor_mapfile, there must be an entry with vofrontend_service definition (in this case):
GSI "^\/DC\=org\/DC\=doegrids\/OU\=Services\/CN\=Some\ Name\ 834323%ENDCOLOR%$" %GREEN%vofrontend_service%ENDCOLOR%
Entry configuration
Entries are grid/cloud endpoints (aka Compute Elements, or gatekeepers) that can accept job requests and run pilots (which will run user jobs). Each entry needs to be configured to communicate to a specific gatekeeper.
An example test entry is provided in the default GlideinWMS configuration file. At the very least, you will need to modify the entry line:
<entry name="%RED%ENTRY_NAME%ENDCOLOR%" enabled="True" auth_method="grid_proxy" trust_domain="OSG"
gatekeeper="%RED%gatekeeper.domain.tld/jobmanager-type%ENDCOLOR%" gridtype="gt2" rsl="(queue=default)(jobtype=single)"
schedd_name="%RED%schedd_glideins2@FACTORY_HOSTNAME%ENDCOLOR%" verbosity="std" work_dir="OSG">
You will need to modify the entry name and gatekeeper. This will determine the gatekeeper that you access. Specific gatekeepers often require specific "rsl" attributes that determine the job queue that you are submitting to, or other attributes. Add them in the rsl attribute.
Also, be sure to distribute your entries across the various HTCondor schedd work managers to balance load. To see the available schedd use condor_status -schedd -l | grep Name.
Several schedd options are configured by default for you: schedd_glideins2, schedd_glideins3, schedd_glideins4, schedd_glideins5, as well as the default schedd. This can be modified in the HTCondor configuration. Add any specific options, such as limitations on jobs/pilots or glexec/voms requirements in the entry section below the above line. More details are in the GlideinWMS Factory configuration guide.
!!! warning If there is no match between auth_metod and trust_domain of the entry and the type and trust_domain listed in one of the credentials of one of the Frontends using this Factory, then no job can run on that entry.
The Factory must advertise the correct Resource Name of each entry for accounting purposes. Then the Factory must also advertise in the entry all the attributes that will allow to match the query expression used in the Frontends connecting to this Factory (e.g. <factory query_expr='((stringListMember("%PINK%VO%ENDCOLOR%", GLIDEIN_Supported_VOs)))'> as explained in the VO frontend configuration document ).
Note
Keep an eye on this part as we're dealing with singularity. Then you must advertise correctly if the site supports gLExec. If it does not set GLEXEC_BIN to NONE, if gLExec is installed via OSG set it to OSG, otherwise set it to the path of gLExec.
For example this snippet advertises GLIDEIN_Supported_VOs attribute with the supported VO so that can be used with the query above in the VO frontend and says that the resource does not support gLExec:
<entry name="RESOURCE_NAME" ...
   <config>
   ...
      <attrs>
      ...
         <attr name="GLIDEIN_Supported_VOs" const="True" glidein_publish="True" job_publish="True"
         parameter="True" publish="True" type="string" value="%PINK%VO%ENDCOLOR%"/>
         <attr name="GLEXEC_BIN" const="True" glidein_publish="False" job_publish="False" parameter="True"
         publish="True" type="string" value="%RED%NONE%ENDCOLOR%"/>
         <attr name="GLIDEIN_Resource_Name" const="True" glidein_publish="True" job_publish="True"
       parameter="True" publish="True" type="string" value="%RED%SiteNameFromOIM%ENDCOLOR%"/>
     </attrs>
Note
Specially if jobs are sent to OSG resources, it is very important to set the GLIDEIN_Resource_Name and to be consistent with the Resource Name reported in OIM because that name will be used for job accounting in Gratia. It should be the name of the Resource in OIM or the name of the Resource Group (specially if there are many gatekeepers submitting to the same cluster).
More information on options can be found here
Configuring Tarballs
Each pilot will download HTCondor binaries from the staging area. Often, multiple binaries are needed to support various architectures and platforms. Currently, you will need to provide at least one tarball for GlideinWMS to use. (Using the system binaries is currently not supported).
Download a HTCondor tarball from here. Suggested is to put the binaries in /var/lib/gwms-factory/condor, but any factory-accessible location will do just fine.
Once you have downloaded the tarball, configure it in /etc/gwms-factory/glideinWMS.xml like in the following:
<condor_tarball arch="default" base_dir="/var/lib/gwms-factory/condor/condor-8.7.6-x86_64_RedHat6-stripped" os="rhel6" version="default"/>
Remember also to modify the condor_os and condor_arch attributes in the entries (the configured Compute Elements) to pick the correct HTCondor binary.
Here are more details on using multiple HTCondor binaries. Note that is sufficient to set the base_dir; the reconfigure command will prepare the tarball and add it to the XML config file.
Configuring HTCondor
The HTCondor configuration for the Factory is placed in /etc/condor/config.d.
- 00_gwms_factory_general.config
- 00-restart_peaceful.config
- 01_gwms_factory_collectors.config
- 02_gwms_factory_schedds.config
- 03_gwms_local.config
- 10-batch_gahp_blahp.config
Get rid of the pre-loaded HTCondor default
root@host # rm /etc/condor/config.d/00personal_condor.config
root@host # touch /etc/condor/config.d/00personal_condor.config
For most installations, the items you need to modify are in 03_gwms_factory_local.config. The lines you will have to edit are:
- Credentials of the machine. You can either run using a proxy, or a service certificate. It is recommended to use a host certificate and specify its location in the variables
GSI_DAEMON_CERTandGSI_DAEMON_KEY. The host certificate should be owned by root and have the correct permissions, 600. - HTCondor ids in the form UID.GID (both are integers)
- HTCondor admin email. Will receive messages when services fail.
#-- HTCondor user: condor
CONDOR_IDS =
#--  Contact (via email) when problems occur
CONDOR_ADMIN =

############################
# GSI Security config
############################
#-- Grid Certificate directory
GSI_DAEMON_TRUSTED_CA_DIR= /etc/grid-security/certificates

#-- Credentials
GSI_DAEMON_CERT =  /etc/grid-security/hostcert.pem
GSI_DAEMON_KEY  =  /etc/grid-security/hostkey.pem

#-- HTCondor mapfile
CERTIFICATE_MAPFILE= /etc/condor/certs/condor_mapfile

###################################
# Whitelist of HTCondor daemon DNs
###################################
#DAEMON_LIST = COLLECTOR, MASTER, NEGOTIATOR, SCHEDD, STARTD
Using other HTCondor RPMs, e.g. UW Madison HTCondor RPM
The above procedure will work if you are using the OSG HTCondor RPMS. You can verify that you used the OSG HTCondor RPM by using yum list condor. The version name should include "osg", e.g. 8.6.9-1.1.osg34.el7.
If you are using the UW Madison HTCondor RPMS, be aware of the following changes:
- This HTCondor RPM uses a file
/etc/condor/condor_config.localto add your local machine slot to the user pool. - If you want to disable this behavior (recommended), you should blank out that file or comment out the line in
/etc/condor/condor_configfor LOCAL_CONFIG_FILE. (Make sure that LOCAL_CONFIG_DIR is set to/etc/condor/config.d) - Note that the variable LOCAL_DIR is set differently in UW Madison and OSG RPMs. This should not cause any more problems in the Glideinwms RPMs, but please take note if you use this variable in your job submissions or other customizations.
In general if you are using a non OSG RPM or if you added custom configuration files for HTCondor please check the order of the configuration files:
root@host # condor_config_val -config
Configuration source:
    /etc/condor/condor_config
Local configuration sources:
    /etc/condor/config.d/00-restart_peaceful.config
    /etc/condor/config.d/00_gwms_factory_general.config
    /etc/condor/config.d/01_gwms_factory_collectors.config
    /etc/condor/config.d/02_gwms_factory_schedds.config
    /etc/condor/config.d/03_gwms_local.config
    /etc/condor/config.d/10-batch_gahp_blahp.config
    /etc/condor/condor_config.local
Restarting HTCondor
After configuring HTCondor, be sure to restart HTCondor:
root@host # service condor restart
Create a HTCondor grid mapfile.
The HTCondor grid mapfile /etc/condor/certs/condor_mapfile is used for authentication between the glidein running on a remote worker node, and the local collector. HTCondor uses the mapfile to map certificates to pseudo-users on the local machine. It is important that you map the DN's of each frontend you are talking to.
Below is an example mapfile, by default found in /etc/condor/certs/condor_mapfile:
GSI "^\/DC\=org\/DC\=doegrids\/OU\=People\/CN\=Some\ Name\ 123456$" frontend
GSI (.*) anonymous
FS (.*) \1
Each frontend needs a line that maps to the user specified in the identity argument in the frontend security section of the Factory configuration.
Reconfiguring GlideinWMS
After changing the configuration of GlideinWMS and making sure that Factory is running, use the following table to find the appropriate command for your operating system (run as root):
| If your operating system is... | Run the following command... |
|---|---|
| Enterprise Linux 7 | systemctl reload gwms-factory |
| Enterprise Linux 6 | service gwms-factory reconfig |
Note
Notice that, in the case of Enterprise Linux 7 systemctl reload gwms-factory will work only if:
- gwms-factory service is running
- gwms-factory service was started with systemctl
Otherwise, you will get the following error in any of the cases:
# systemctl reload gwms-factory
Job for gwms-factory.service invalid.
Upgrading GlideinWMS
Before you start the Factory service for the first time or after an update of the RPM or after you change GlideinWMS scripts, you should always use the GlideinWMS "upgrade" command. To do so:
-
Make sure the
condorandgwms-factoryservices are stopped (in EL6 this will be done for you). -
Issue the upgrade command:
-
If you are using Enterprise Linux 7:
root@host # /usr/sbin/gwms-factory upgrade -
If you are using Enterprise Linux 6:
root@host # service gwms-factory upgrade -
Start the
condorandgwms-factoryservices (see next part).
Service Activation and Deactivation
To start the Factory you must start also HTCondor and the Web server beside the Factory itself:
# %RED%For RHEL 6, CentOS 6, and SL6%ENDCOLOR%
root@host # service condor start
root@host # service httpd start
root@host # service gwms-factory start

# %RED% For RHEL 7, CentOS 7, and SL7%ENDCOLOR%
root@host # systemctl start condor
root@host # systemctl start httpd
root@host # systemctl start gwms-factory
Note
Once you successfully start using the Factory service, anytime you change the /etc/gwms-factory/glideinWMS.xml file you will need to run a reconfig/reload command. If you change also some code you need the upgrade command mentioned above:
# %RED% For RHEL 6, CentOS 6, and SL6%ENDCOLOR%
root@host # service gwms-factory reconfig


# %RED% But the situation is a bit more complicated in RHEL 7, CentOS 7, and SL7 due to systemd restrictions%ENDCOLOR%
# %GREEN% For reconfig:%ENDCOLOR%
A. %RED% when the Factory is running%ENDCOLOR%
A.1 %RED% without any additional options%ENDCOLOR%
root@host # /usr/sbin/gwms-factory reconfig%ENDCOLOR%
or
root@host # systemctl reload gwms-factory

A.2 %RED% if you want to give additional options %ENDCOLOR%
systemctl stop gwms-factory
/usr/sbin/gwms-factory reconfig "and your options"
systemctl start gwms-factory

B. %RED% when the Factory is NOT running %ENDCOLOR%
root@host # /usr/sbin/gwms-factory reconfig ("and your options")
To enable the services so that they restart after a reboot:
# %RED%# For RHEL 6, CentOS 6, and SL6%ENDCOLOR%
root@host # /sbin/chkconfig fetch-crl-cron on
root@host # /sbin/chkconfig fetch-crl-boot on
root@host # /sbin/chkconfig condor on
root@host # /sbin/chkconfig httpd on
root@host # /sbin/chkconfig gwms-factory on
# %RED%# For RHEL 7, CentOS 7, and SL7%ENDCOLOR%
root@host # systemctl enable fetch-crl-cron
root@host # systemctl enable fetch-crl-boot
root@host # systemctl enable condor
root@host # systemctl enable httpd
root@host # systemctl enable gwms-factory
To stop the Factory:
# %RED%For RHEL 6, CentOS 6, and SL6 %ENDCOLOR%
root@host # service gwms-factory stop
# %RED%For RHEL 7, CentOS 7, and SL7%ENDCOLOR%
root@host # systemctl stop gwms-factory
And you can stop also the other services if you are not using them independently of the Factory.
Validating GlideinWMS Factory
The complete validation of the Factory is the submission of actual jobs.
You can also check that the services are up and running:
root@host # condor_status -any

MyType               TargetType           Name

glidefactoryclient   None                 12345_TEST_ENTRY@gfactory_instance@
glideclient          None                 12345_TEST_ENTRY@gfactory_instance@
glidefactory         None                 TEST_ENTRY@gfactory_instance@
glidefactoryglobal   None                 gfactory_instance@gfactory_ser
glideclientglobal    None                 gfactory_instance@gfactory_ser
Scheduler            None                 hostname.fnal.gov
DaemonMaster         None                 hostname.fnal.gov
Negotiator           None                 hostname.fnal.gov
Scheduler            None                 schedd_glideins2@hostname
Scheduler            None                 schedd_glideins3@hostname
Scheduler            None                 schedd_glideins4@hostname
Scheduler            None                 schedd_glideins5@hostname
Collector            None                 wmscollector_service@hostname
-
You should have one "glidefactory" classAd for each entry that you have enabled. If you have already configured the frontends, you will also have one glidefactoryclient and one glideclient classAd for each frontend / entry.
-
You can check also the monitoring Web page:
http://YOUR_HOST_FQDN/factory/monitor/ -
You can also test the local submission of a job to a resource using the test script local_start.sh but you must first install the OSG client tools and generate a proxy. After that you can run the test (replace ENTRY_NAME with the name of one of the entries in
/etc/gwms-factory/glideinWMS.xml):
Check Web server configuration for the monitoring
Verify path and specially the URL for the GlideinWMS files served by your web server:
stage base_dir="/var/lib/gwms-factory/web-area/stage" use_symlink="True" web_base_url="http://HOSTNAME:PORT/factory/stage"
This will determine the location of your web server. Make sure that the URL is visible. Depending on your firewall or the one of your organization, you may need to change the port here and in the httpd configuration (by modifying the "Listen" directive in /etc/httpd/conf/httpd.conf). Note that web servers are an often an attacked piece of infrastruture, so you may want to go through the Apache configuration in /etc/httpd/conf/httpd.conf and disable unneeded modules.
Troubleshooting GlideinWMS Factory
File Locations
| File Description | File Location | Comment |
|---|---|---|
| Configuration file | /etc/gwms-factory/glideinWMS.xml | Main configuration file |
| Logs | /var/log/gwms-factory/server/factory | Overall server logs |
| /var/log/gwms-factory/server/entry_NAME | Specific entry logs (generally more useful) | |
| /var/log/gwms-factory/client | Glidein Pilot logs seperated by user and entry | |
| Startup script | /etc/init.d/gwms-factory | |
| Web Directory | /var/lib/gwms-factory/web-area | |
| Web Base | /var/lib/gwms-factory/web-base | |
| Working Directory | /var/lib/gwms-factory/work-dir/ |
Increase the log level and change rotation policies
You can increase the log level of the frontend. To add a log file with all the log information add the following line with all the message types in the process_log section of /etc/gwms-factory/glideinWMS.xml:
<log_retention>
   <process_logs>
       <process_log extension="all" max_days="7.0" max_mbytes="100.0" min_days="3.0" msg_types="DEBUG,EXCEPTION,INFO,ERROR,ERR"/>
You can also change the rotation policy and choose whether compress the rotated files, all in the same section of the config files:
- max_bytes is the max size of the log files
- max_days it will be rotated.
- compression specifies if rotated files are compressed
- backup_count is the number of rotated log files kept
Further details are in the reference documentation.
Failed authentication errors
If you get messages such as these in the logs, the Factory does not trust the frontend and will not submit glideins.
WARNING: Client fermicloud128-fnal-gov_OSG_gWMSFrontend.main (secid: frontend_name) not in white list. Skipping request
This error means that the frontend name in the security section of the Factory does not match the security_name in the frontend.
Client fermicloud128-fnal-gov_OSG_gWMSFrontend.main (secid: frontend_name) is not coming from a trusted source;
 AuthenticatedIdentity [email protected][email protected].
Skipping for security reasons.
This error means that the identity in the security section of the Factory does not match what the /etc/condor/certs/condor_mapfile authenticates the Frontend to in HTCondor (!Authenticated Identity in the classad).
Make sure the attributes are correctly lined up as in the Frontend security configuration section above.
Glideins start but do not connect to User pool / VO Frontend
Check the appropriate job err and out logs in /var/log/gwms-factory/client to see if any errors were reported.
Often, this will be a pilot unable to access a web server or with an invalid proxy. Also, verify that the condor_mapfile is correct on the VO Frontend's user pool collector and configuration.
Glideins start but fail before running job with error "Proxy not long lived enough"
If the glideins are running on a resource (entry) but the jobs are not running and the log files in /var/log/gwms-factory/client/user_frontend/glidein_gfactory_instance/ENTRY_NAME report an error like "Proxy not long lived enough (86096 s left), shortened retire time ...", then probably the HTCondor RLM on the Compute Element is delegating the proxy and shortening its lifespan.
This can be fixed by setting DELEGATE_JOB_GSI_CREDENTIALS = FALSE as suggested in the CE install document.