Intermediate DAGMan: Uses and Features
This tutorial helps you explore HTCondor's DAGMan and its many features.
Before you start...
Before working on this tutorial, we recommend that you read through our other DAGMan guides: The definitive guide to DAGMan is the HTCondor DAGMan Manual..
You can download the tutorial materials with the following command:
$ git clone https://github.com/OSGConnect/tutorial-dagman-intermediateNow move into the new directory with
$ cd tutorial-dagman-intermediateand list its contents with
$ ls -lHere are the highlights:
- The
diamond.dagfile and theSleepJobdirectory are the worked example of a "Diamond DAG" for this tutorial. - The
additional_examplesdirectory contains additional examples, each with their ownREADMEfile exploring specific DAGMan features.
Types of DAGs
Any workflow that satisfies the definition of a "Directed Acyclic Graph" (DAG) can be executed using DAGMan. That being said, there are certain types that are the most commonly used:
-
Sequential DAG: all the nodes are connected in a sequence of one after the other, with no branching or splitting. This is good for conducting increasingly refined analyses of a dataset or initial result, or chaining together a long-running calculation. The simplest example of this type is used in the guide Simple Example of a DAGMan Workflow.
-
Split and recombine DAG: the first node is connected to many nodes of the same layer (split) which then all connect back to the final node (recombine). Here, you can set up the shared environment in the first node and use it to parallelize the work into many individual jobs, then finally combine/analyze the results in the final node. The simplest example of this type is the "Diamond DAG" - the subject of this tutorial.
-
Collection DAG: no node is connected to any other node. This is good for the situation where you need to run a bunch of otherwise unrelated jobs, perhaps ones that are competing for a limited resource. The simplest example of this type is a DAG consisting of a single node.
These types are by no means "official", nor are they the only types of structure that a DAG can take. Rather, they serve as starting points from which you can build your own DAG workflow, which will likely consist of some combination of the above elements.
The Diamond DAG
The "Diamond DAG" is the simplest example of a "split and recombine" DAG, pictured here:
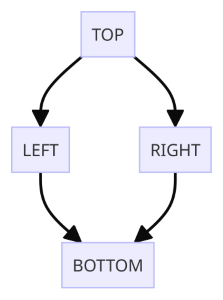
As shown in the image, the first node TOP is connected to two nodes LEFT and RIGHT (the "split"), which are then connected to the final node BOTTOM (the "recombine").
The DAGMan input file
To describe the flow of the DAG and the parts needed to execute it, DAGMan uses a custom description language in an input file, typically named <DAG Name>.dag.
The two most important commands in the DAG description language are:
JOB <NodeName> <NodeSubmitFile>- Describes a node and the submit file it will use to run the node.PARENT <NodeName1> CHILD <NodeName2>- Describes the edge starting from<NodeName1>and pointing to<NodeName2>.
These commands have been used to construct the Diamond DAG and are saved in the file diamond.dag.
To view the contents of diamond.dag, run
$ cat diamond.dagBefore you continue, we recommend that you closely examine the contents of diamond.dag:
- Can you identify the nodes and how they are connected?
- Can you confirm that this file accurately represent the figure above?
- Can you determine the HTCondor job associated with each node?
Submitting a DAG
When you are ready, submit the DAG workflow to DAGMan by running:
$ condor_submit_dag diamond.dagor
$ htcondor dag submit diamond.dagWhat Happens?
When you submit a DAG, HTCondor creates a special DAGMan job in your queue, then prints out a list of files associated with the submission.
The job that is created corresponds to the instance of DAGMan that is managing the job submissions. The files associated with this job are
<DAG Name>.condor.sub- Submit file for the DAGMan job<DAG Name>.dagman.log- Job event log file for the DAGMan job<DAG Name>.lib.err- Standard error stream file for the DAGMan job<DAG Name>.lib.out- Standard output stream file for the DAGMan job
For most part, you can ignore these files.
The running DAGMan instance also generates files as part of its management of your workflow:
<DAG Name>.dagman.out- Reports the actions taken by DAGMan for managing the workflow<DAG Name>.nodes.log- Collection of all HTCondor log entries for every job DAGMan submits<DAG Name>.metrics- JSON formatted information about the DAG
These files are useful for monitoring and troubleshooting.
Monitoring DAGMan
Since DAGMan runs as a special job in the queue, you can monitor it like any other job.
A plain condor_q command will show a condensed batch view of the jobs submitted, running, and managed by the DAGMan job.
You can get more information about the jobs that DAGMan is managing by using the -nobatch and -dag flags:
# Basic job query (Batched/Condensed)
$ condor_q

# Non-Batched query
$ condor_q -nobatch

# Increased information
$ condor_q -nobatch -dag
You can also watch the progress of the DAG and the jobs running under it by running:
$ condor_watch_qFor more detail about the status and progress of your DAG workflow, you can use the noun-verb command:
$ htcondor dag status DAGManJobIDwhere DAGManJobID is the ID for the DAGMan job.
Note that the information in the output of this command does not update frequently, and so it is not suited for short-lived DAG workflows such as the current example.
When your DAG workflow has completed, the DAGMan job will disappear from the queue.
- If the DAG workflow completed successfully, then the
.dag.dagman.outfile should have a message thatAll jobs Completed!, though it may be difficult to find manually (try usinggrep "All jobs Completed!" *.dag.dagman.outinstead). - If the DAG workflow was aborted due to an error, then the
.dag.dagman.outfile should have the messageAborting DAG....
Assuming that the DAGMan job did not crash, then regardless the final line of the .dag.dagman.out file should contain (condor_DAGMAN) pid ####### EXITING WITH STATUS #, where the number after STATUS is the exit code (0 if success, not 0 if failure).
How DAGMan Handles Relative Paths
By default, the directory that DAGMan submits all jobs from is the same directory where you ran the condor_submit_dag command.
This is the starting directory for any relative path in the .dag input file or in the node .sub files that DAGMan submits.
This concept is demonstrated in the diamond.dag input file and the sleep.sub submit file in the SleepJob sub-directory.
In the diamond.dag file, the jobs are declared using a relative path.
For example:
JOB TOP ./SleepJob/sleep.sub
This tells DAGMan that the submit file for the JOB TOP is sleep.sub, located in the SleepJob in the submit directory (.).
Similarly, the submit file sleep.sub uses paths relative to the submit directory for defining the save locations for the .log, .out, and .err files, i.e.,
log = ./SleepJob/$(JOB).log
This behavior is consistent with submission of regular (non-DAGMan) jobs, e.g. condor_submit SleepJob/sleep.sub.
Note: the
.dag.*log/output files generated by the DAGMan job will always be in the same directory as the.daginput file.
This is just the default behavior, and there are ways to make the location of job submission/management more obvious. See the HTCondor documentation for more details: File Paths in DAGs.
Additional Examples
Additional examples that cover various topics related to DAGMan are provided in the folder additional_examples with corresponding READMEs.
The following order of the examples is recommended:
RescueDag- Example for DAGs that don't exit successfullyPreScript- Example using a pre-script for a nodePostScript- Example using a post-script for a nodeRetry- Example for retrying a failed nodeVARS- Example of reusing a single submit file for multiple nodes with differing variablesSubDAG(advanced) - Example using a subDAGSplice(advanced) - Example of using DAG splices